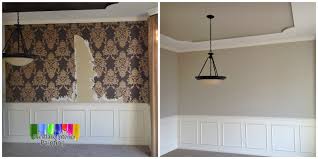
Have you ever walked into a freshly painted room and marveled at how it transformed the space? A new coat of paint can breathe life into any area, but achieving that flawless finish requires more than just a brush and some paint. As someone who’s tackled numerous interior painting projects (and learned from plenty of mistakes!), I can tell you that the key to a professional-looking paint job lies in careful preparation and attention to detail.
Follow this comprehensive DIY painting guide to ensure your next home improvement project is a success. Let’s dive in!
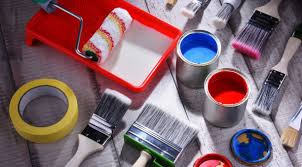
Step 1: Gather Your Painting Supplies
Preparation is crucial for any home painting project. Trust me, there’s nothing worse than being elbow-deep in paint and realizing you forgot something essential! Here’s what you’ll need for your DIY paint job:
Choosing the Right Paint
The right paint makes all the difference in your home improvement project. Here’s a quick rundown of paint sheens for interior painting:
- Flat/Matte: Best for low-traffic areas and hiding wall imperfections
- Eggshell: Ideal for living rooms and dining areas, offering a subtle sheen
- Satin: Perfect for high-traffic areas like kitchens and bathrooms, easy to clean
- Semi-Gloss: Great for trim, doors, and cabinets, providing a durable finish
- Gloss: Often used for furniture or surfaces that need frequent cleaning
Pro tip: Many modern paints include primer, but you might still need a separate primer for dark colors or new surfaces when painting walls.
Other Essential Painting Supplies
- Wall primer
- Surface sealer (for problematic surfaces)
- Paint brushes and rollers
- Painter’s tape for clean edges
- Drop cloths to protect floors
- Caulk and spackling for wall repairs
- Sanding supplies for smooth surfaces
- Paint filter for smooth application
- Stir sticks and paint trays
Step 2: Prepare Your Space for Painting
Now that you have your supplies, it’s time to prep the area. This step is often overlooked in DIY painting, but it’s crucial for a professional finish.
- Move furniture out or cover it with drop cloths
- Clean the walls thoroughly to ensure paint adhesion
- Examine and prepare the trim:
- Fill holes and cracks with Durabond 20-minute mud
- Sand smooth with 120-grit sandpaper
- Caulk gaps between trim and walls for a seamless look
Personal experience: I once skipped proper wall cleaning and ended up with paint that wouldn’t adhere properly. Learn from my mistake – don’t rush this crucial step in your home improvement project!
Step 3: Prime the Walls and Trim
Priming is essential for new surfaces, dramatic color changes, or humid environments. It creates a smooth base for your paint and ensures the color looks its best in your interior design.
For problematic surfaces:
- Sand peeling areas with 120-grit sandpaper
- Apply a surface sealer to prevent future issues
- Prime the area for best paint adhesion
Don’t forget to sand after priming for an ultra-smooth finish on your walls!
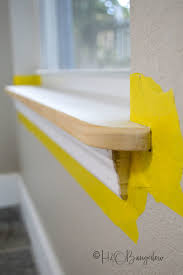
Step 4: Master the Art of Taping and Cutting In
Before you start applying paint to your walls, it’s crucial to understand two key techniques: taping and cutting in. These skills will give your paint job clean lines and a professional finish.
Taping Tips for Clean Lines
- Choose the right tape: Use high-quality painter’s tape, not masking tape. Brands like FrogTape or ScotchBlue are designed to prevent paint bleed.
- Apply tape to dry, clean surfaces: Ensure the area is dust-free and completely dry before applying tape.
- Press firmly: Use a putty knife or credit card to press down the edges of the tape, creating a tight seal.
- Remove tape at the right time: Pull off the tape while the paint is still slightly wet, or wait until it’s completely dry. Removing semi-dry paint can cause peeling.
- Pull at a 45-degree angle: When removing tape, pull it back on itself at a 45-degree angle for the cleanest removal.
- Consider taping techniques for textured walls: For textured surfaces, run a thin bead of caulk along the edge of the tape, then smooth it with your finger. This creates a seal that prevents paint from seeping under the tape.
Cutting In Like a Pro
Cutting in refers to painting the edges of your walls where they meet the ceiling, baseboards, or adjacent walls. It’s a crucial skill for achieving crisp, clean lines without relying on tape.
- Use the right brush: A 2-2.5 inch angled brush gives you the most control for cutting in.
- Load your brush properly: Dip only about 1/3 of the bristles into the paint, then tap (don’t wipe) the brush on the side of the can to remove excess.
- Create a paint reservoir: Start about 1/2 inch away from the edge you’re cutting in. Apply paint in a 2-3 inch strip parallel to the edge.
- Work in sections: Paint about 2-3 feet at a time, keeping a wet edge.
- Steady your hand: Rest your hand on the wall for stability as you paint. Use your pinky as a guide along the edge for straighter lines.
- Feather the edges: As you paint away from the edge, lightly feather out the paint to blend it with the area you’ll be rolling.
- Practice makes perfect: Don’t get discouraged if your first attempts aren’t flawless. Cutting in is a skill that improves with practice.

Pro tip: If you’re new to painting or working in a particularly tricky area, you can use both taping and cutting in techniques. Apply tape, then cut in along the tape edge for extra insurance against paint bleed.
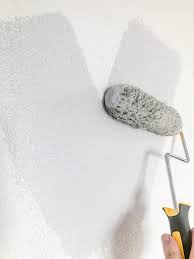
Step 5: Roll the Walls for Even Paint Coverage
This is where the transformation really begins! After cutting in, it’s time to roll the larger wall areas.
Tips for rolling walls:
- Use a “W” or “M” pattern for even paint coverage
- Avoid overloading the roller to prevent drips
- Keep a wet edge to prevent lap marks in your paint job
Personal tip: An extension pole for your roller is a game-changer for painting high walls and ceilings. Your back will thank you during your DIY project!
Step 6: Sand Between Coats for a Smooth Finish
For a truly professional paint job, don’t skip this step! After the first coat dries:
- Lightly sand with 120-grit sandpaper
- Wipe down surfaces with a damp cloth to remove dust
- Apply the next coat of paint for full coverage
Step 7: Apply Additional Coats of Paint
Most walls need at least two coats of paint for full coverage. Be patient and let each coat dry completely before applying the next for the best results.
Step 8: Clean Up After Painting
Once you’re satisfied with your paint job and everything’s dry:
- Carefully remove painter’s tape for clean edges
- Clean brushes and rollers thoroughly
- Dispose of or store leftover paint properly for future touch-ups
Conclusion: Enjoy Your Freshly Painted Space!
With proper preparation and the right techniques, you can achieve a professional-quality paint job that revitalizes your home interior. Take your time, follow these steps, and soon you’ll be admiring your DIY handiwork with pride.
Remember, practice makes perfect in home improvement. Each painting project you tackle will improve your skills. So don’t be discouraged if your first attempt isn’t flawless – mine certainly wasn’t!
Quick Checklist for the Perfect DIY Paint Job:
- Gather all painting supplies before starting
- Thoroughly prepare the space and surfaces
- Prime walls when necessary
- Master taping and cutting in techniques
- Roll walls using proper technique
- Sand between coats for a smooth finish
- Apply multiple thin coats rather than one thick coat
- Clean up properly to preserve your painting tools
Happy painting and enjoy your freshly updated home interior!